
Imagine a scenario where navigating an Android device becomes as seamless and powerful as working on a desktop computer, with multiple apps floating effortlessly on the screen, ready to be resized or repositioned at will. This isn’t just a dream for tech enthusiasts but a reality brought to life by an innovative third-party app that has recently caught the attention of power users. This tool transforms the way Android devices are used, offering a level of multitasking that feels like a significant leap forward. It’s a discovery that elicits a genuine sense of awe, reminiscent of a classic 90s movie moment of surprise and excitement. Beyond its impressive capabilities, the setup is surprisingly quick, taking just a few minutes to turn any compatible Android phone into a productivity powerhouse, regardless of the manufacturer or the device’s age within reasonable limits. While this solution caters primarily to tech-savvy individuals due to a slightly intricate initial configuration, its latest update introduces such a game-changing feature that it deserves to be shared with a wider audience eager to enhance their mobile experience.
1. Redefining Android Navigation and Productivity
The core of this multitasking breakthrough lies in a lesser-known app called Panels, which has been quietly revolutionizing how users interact with their Android devices. This tool offers a unique approach by providing an always-accessible app drawer that can be summoned with a simple gesture, no matter what screen or app is currently active. Unlike the traditional method of returning to the home screen to locate and launch apps, Panels allows users to swipe on the upper-left side of the screen to reveal a sliding menu of all installed applications. This functionality alone significantly streamlines navigation, saving precious time and maintaining workflow momentum. For those constantly switching between tasks or apps, this feature is a subtle yet powerful enhancement to the Android experience, making the device feel more intuitive and responsive to user needs.
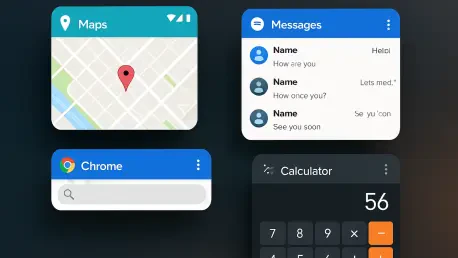
What truly sets Panels apart, however, is a recent update that elevates its utility to new heights. The app now supports opening any installed application in a “freeform window”—a floating, resizable window that can be positioned anywhere on the screen. This mimics a desktop-style multitasking environment, far surpassing the constraints of Android’s standard split-screen mode. Imagine working on a document in a full-screen app while having a calculator or notes app in a small, movable window nearby for quick reference. This flexibility allows for scenarios like drafting an email while glancing at notes in a floating window, keeping the primary task in focus. Compared to similar features on specific devices or in development for Android tablets, Panels offers a more versatile and accessible solution across a broader range of phones, making it a standout option for enhancing productivity.
2. Unleashing Multitasking Potential with Practical Use Cases
The introduction of freeform windows through Panels opens up a plethora of practical applications that can transform daily interactions with Android devices. Consider the efficiency of editing a document while having a calculator app open in a compact floating window, positioned out of the way yet easily accessible for quick computations. This setup eliminates the need to switch back and forth between full-screen apps, maintaining focus on the primary task while still addressing secondary needs. Such a configuration is ideal for professionals or students who often juggle multiple pieces of information simultaneously, ensuring that all necessary tools are just a glance away without disrupting the workflow.
Another compelling use case involves drafting an email while referencing notes or reminders in a separate floating window. This arrangement allows the email composition to remain the central focus on the screen, while the notes app hovers nearby for quick consultation. Unlike the more rigid side-by-side split-screen mode, these freeform windows offer unparalleled control over size and placement, adapting to the user’s immediate requirements. This functionality mirrors desktop windowing systems, which are currently under exploration for Android tablets but not widely available for phones. Panels bridges this gap, delivering a desktop-caliber experience to virtually any Android device, provided the user is willing to navigate the initial setup tailored for those comfortable with advanced customization.
3. Step-by-Step Setup: Downloading and Installing Panels
Getting started with this transformative multitasking tool begins with a straightforward download and installation process. Head to the Google Play Store to acquire the Panels app, ensuring you select the correct one to avoid confusion with similarly named applications. The app is free to download, though a one-time $4 upgrade is available to remove ads from the setup interface and unlock additional features for those seeking an enhanced experience. After installation, open the app and follow the on-screen prompts to grant essential permissions, such as the ability to send notifications and display over other apps. These permissions are crucial for the app’s basic operation and pose minimal risk, being limited in scope to ensure user safety and privacy.
Once the app is installed and permissions are granted, users are ready to dive into the configuration process. The initial setup screen offers a gateway to customizing how Panels integrates with the Android device. This step is vital as it lays the foundation for accessing the app drawer and freeform windows seamlessly. While the setup might seem daunting at first, especially for those less familiar with advanced Android tweaks, the process is designed to be completed in just a few minutes. The focus at this stage is on establishing the core functionality, with finer adjustments available later for those who wish to tailor the experience further. This approach ensures that even users new to such tools can achieve a functional setup with minimal hassle.
4. Configuring the App Drawer for Seamless Access
The next phase involves tailoring the Panels app drawer to suit individual preferences for quick and efficient access. Start by navigating to the “View” option on the main setup screen. Tap the circular pencil icon in the lower-right corner and select “Delete/Reposition/Rename” to begin customization. Remove unnecessary panels by tapping the trash can icon next to “Apps and shortcuts” and “Widgets,” leaving only “App list” active. Then, decide whether to access the app list from the left or right side of the screen based on hand preference—left for those holding the phone in the left hand, right for the opposite. Press and hold the up-down arrows on the “App list” line to move it to the appropriate section, and tap “Apply” to save changes.
After setting the side for access, refine the app drawer’s appearance by tapping “Panels” at the bottom of the setup screen. Scroll through the options at the top to adjust how the pop-up app drawer looks and functions. A recommended adjustment is increasing the number of rows to create a single A-Z scrollable list, making navigation through installed apps quicker with one smooth motion. These settings can be revisited later after some usage to ensure they align with daily habits. This customization ensures that the app drawer is not only accessible but also optimized for speed, reducing the time spent searching for applications and enhancing overall efficiency on the device.
5. Defining the Trigger Area for Instant Activation
Setting up the trigger area is a critical step to ensure the app drawer can be summoned effortlessly from any screen. Tap “Trigger” at the bottom of the Panels setup screen to begin this process. Adjust the “Vertical position” setting (with “Panel’s center” unchecked) and the “Height” setting to define where on the screen, in an up-and-down sense, the swipe gesture will activate the app drawer. This placement should be based on personal comfort, considering where the thumb naturally rests while holding the phone and avoiding overlap with other system gestures like the Android back gesture. Once set, use the down-facing arrow in the settings window to hide the pop-up and confirm the trigger area is positioned correctly.
This customization of the trigger area is essential for integrating Panels into everyday use without disrupting existing navigation habits. A well-placed trigger ensures that accessing the app drawer feels intuitive, whether working on the home screen or deep within another app. For many, positioning the trigger toward the top of the display works best, aligning with natural hand movements and keeping it distinct from other gesture zones. This thoughtful placement minimizes accidental activations while ensuring the feature is always just a swipe away, enhancing the overall fluidity of switching between tasks or launching new apps in a multitasking environment.
6. Activating Freeform Windows for Enhanced Multitasking
To unlock the full potential of Panels, enabling the freeform windows feature is the next crucial step. Return to the main Panels setup menu and tap “More settings.” If the option is visible, toggle on “Enable freeform windows.” If not visible, additional steps are required; otherwise, test the feature by proceeding to the usage instructions. For those needing further configuration, follow the prompt to enable Developer Options by tapping the “Build number” seven times in the device’s system settings as directed. Return to Panels, toggle “Enable freeform windows” again, and follow instructions to navigate to Developer Options. Search for “freeform,” enable the “Enable freeform windows” option, and restart the device. A crucial reminder: avoid altering other settings in Developer Options to prevent unintended issues on the device.
Once the device restarts, the freeform windows functionality should be active, ready to transform how apps are managed on the screen. This feature, still under development for many Android devices, brings a desktop-like experience to mobile multitasking. Users can now swipe along the designated side of the screen—guided by a light line that can be disabled later—to access the app list. Press and hold any app, then select “Freeform window” from the menu to open it as a floating window. Resize or reposition it by holding the top edge to move or swiping the corners to adjust size. This capability offers unprecedented control over app placement, making it easier to handle multiple tasks simultaneously with minimal interruption.
7. Harnessing the Power: Reflections and Future Adjustments
Looking back, the journey to set up Panels and activate its freeform windows marked a significant shift in how Android devices could be utilized for multitasking. The process, though initially complex for some, delivered a setup that felt like stepping into a more advanced era of mobile productivity. Each step, from downloading the app to fine-tuning the trigger area, contributed to a system where apps could be accessed and managed with unparalleled ease. The ability to have floating windows on the screen mirrored the efficiency of desktop environments, a feature that was once thought to be far from reach on smaller devices. This transformation was a testament to the potential hidden in third-party tools to redefine standard Android capabilities.
Moving forward, users are encouraged to revisit Panels’ settings after some time to adjust the app drawer’s appearance or behavior as needed. These post-setup tweaks can further optimize the experience, ensuring it aligns with evolving usage patterns. The beauty of this system lies in its one-time configuration—once the under-the-hood mechanics are set, they rarely need attention again. For those who embraced this tool, the focus can now shift to exploring new ways to leverage floating windows for work or personal tasks. As Android continues to evolve, staying open to such innovative solutions can keep devices at the forefront of efficiency, paving the way for even more groundbreaking multitasking possibilities in the future.